Using Azure Cost Management REST APIs for custom reports

The Cost Management Settings blade in the Azure Portal provides several reports out of the box. However, there are certain requirements that cannot be met using the built in features. In such a case, we could use the REST APIs to create a custom report.

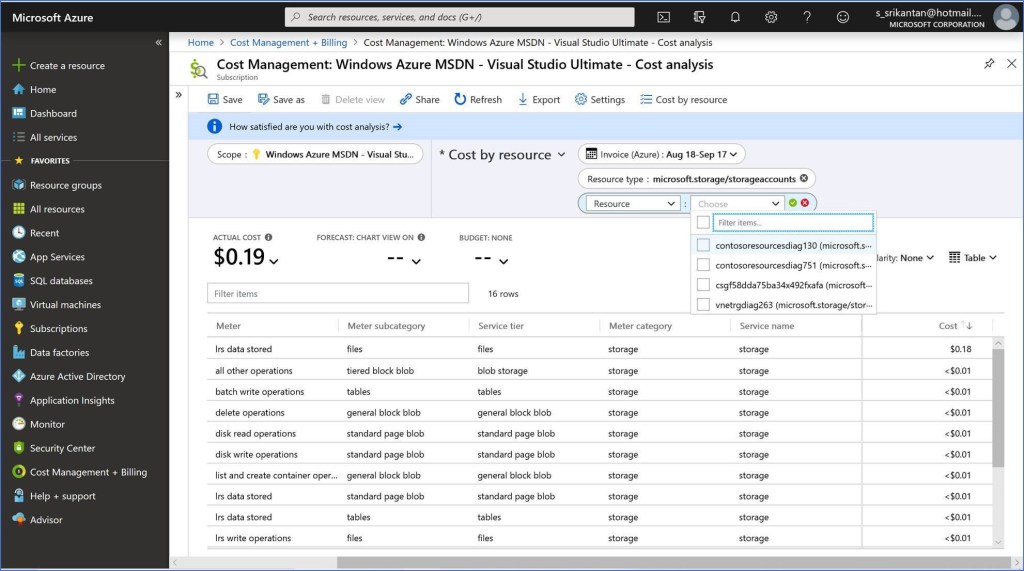
In order to get the spend Meter breakup of all Storage Accounts in the Subscription, you would create a report on the lines shown below. You will notice that the output provides an aggregated number across all Storage Accounts, but does not provide the breakup of the Spend Meter at the Resource Level. The only option that remains is to add a filter on the Report and let the user select each Storage Account and run this report manually for each Storage Account(see below). This could be a very laborious process if there are several Storage Accounts in the Subscription.

We could use the REST APIs exposed for Cost Management in Azure from a Client side Application. I will be using the Postman Tool as the Client side Application in this post.

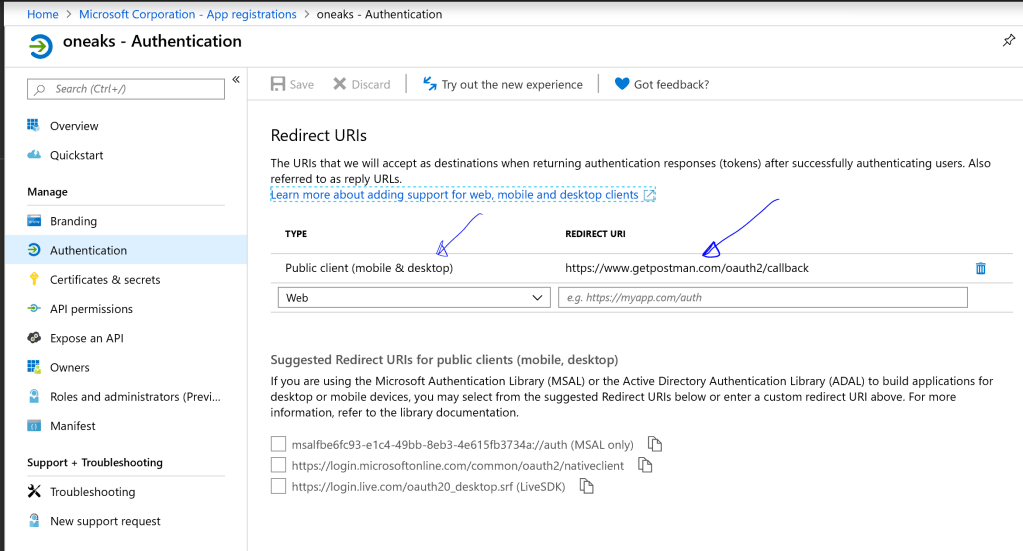
Register the Postman Client Application in the Azure AD Tenant: Create an App Registration in the Azure portal, and choose the type ‘Public Client(Mobile Device & Desktop)’, since we are registering the Postman Client. Set the Redirect URI as shown below.

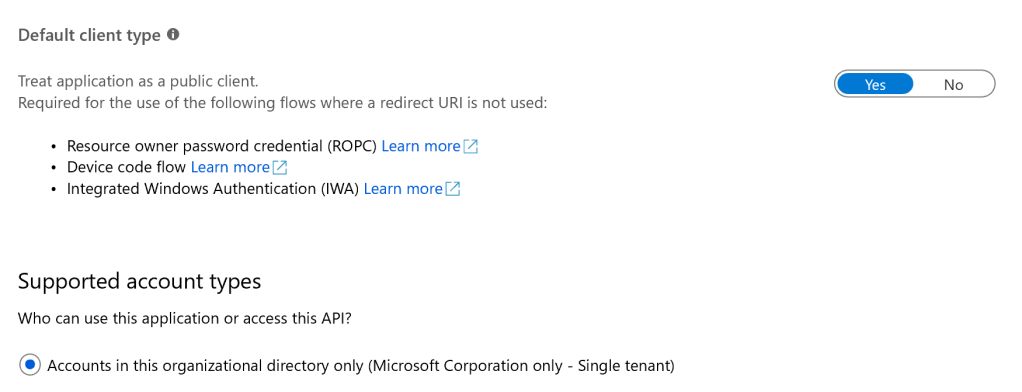
Note down the App ID, generate a Secret and note that down for use later in this post. Set the ‘Default Client type’ as ‘Public Client’ – see below

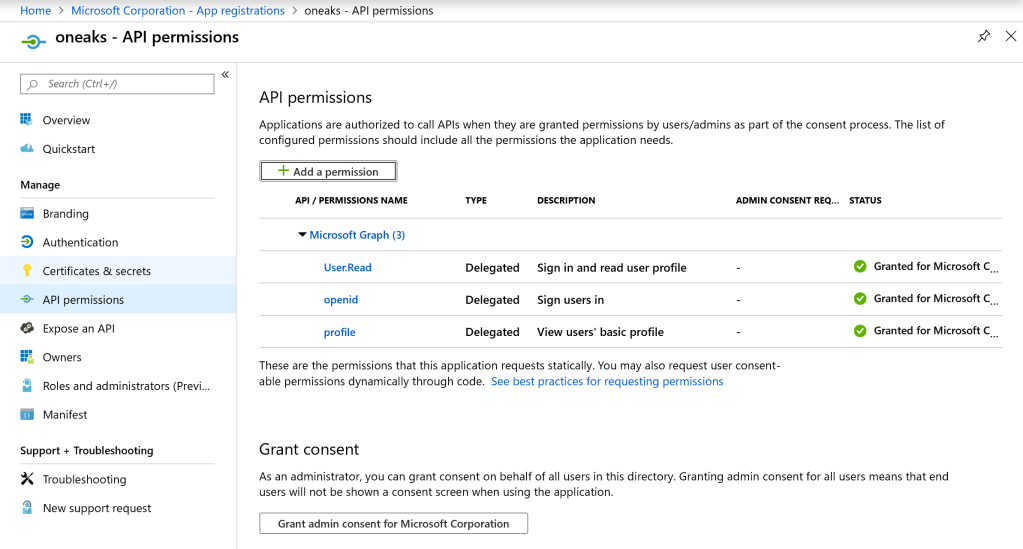
From the ‘API Permissions’ blade in the settings, assign the Postman Client permissions as shown below, to access Azure AD Graph API and sign in the user and read the Profile information.

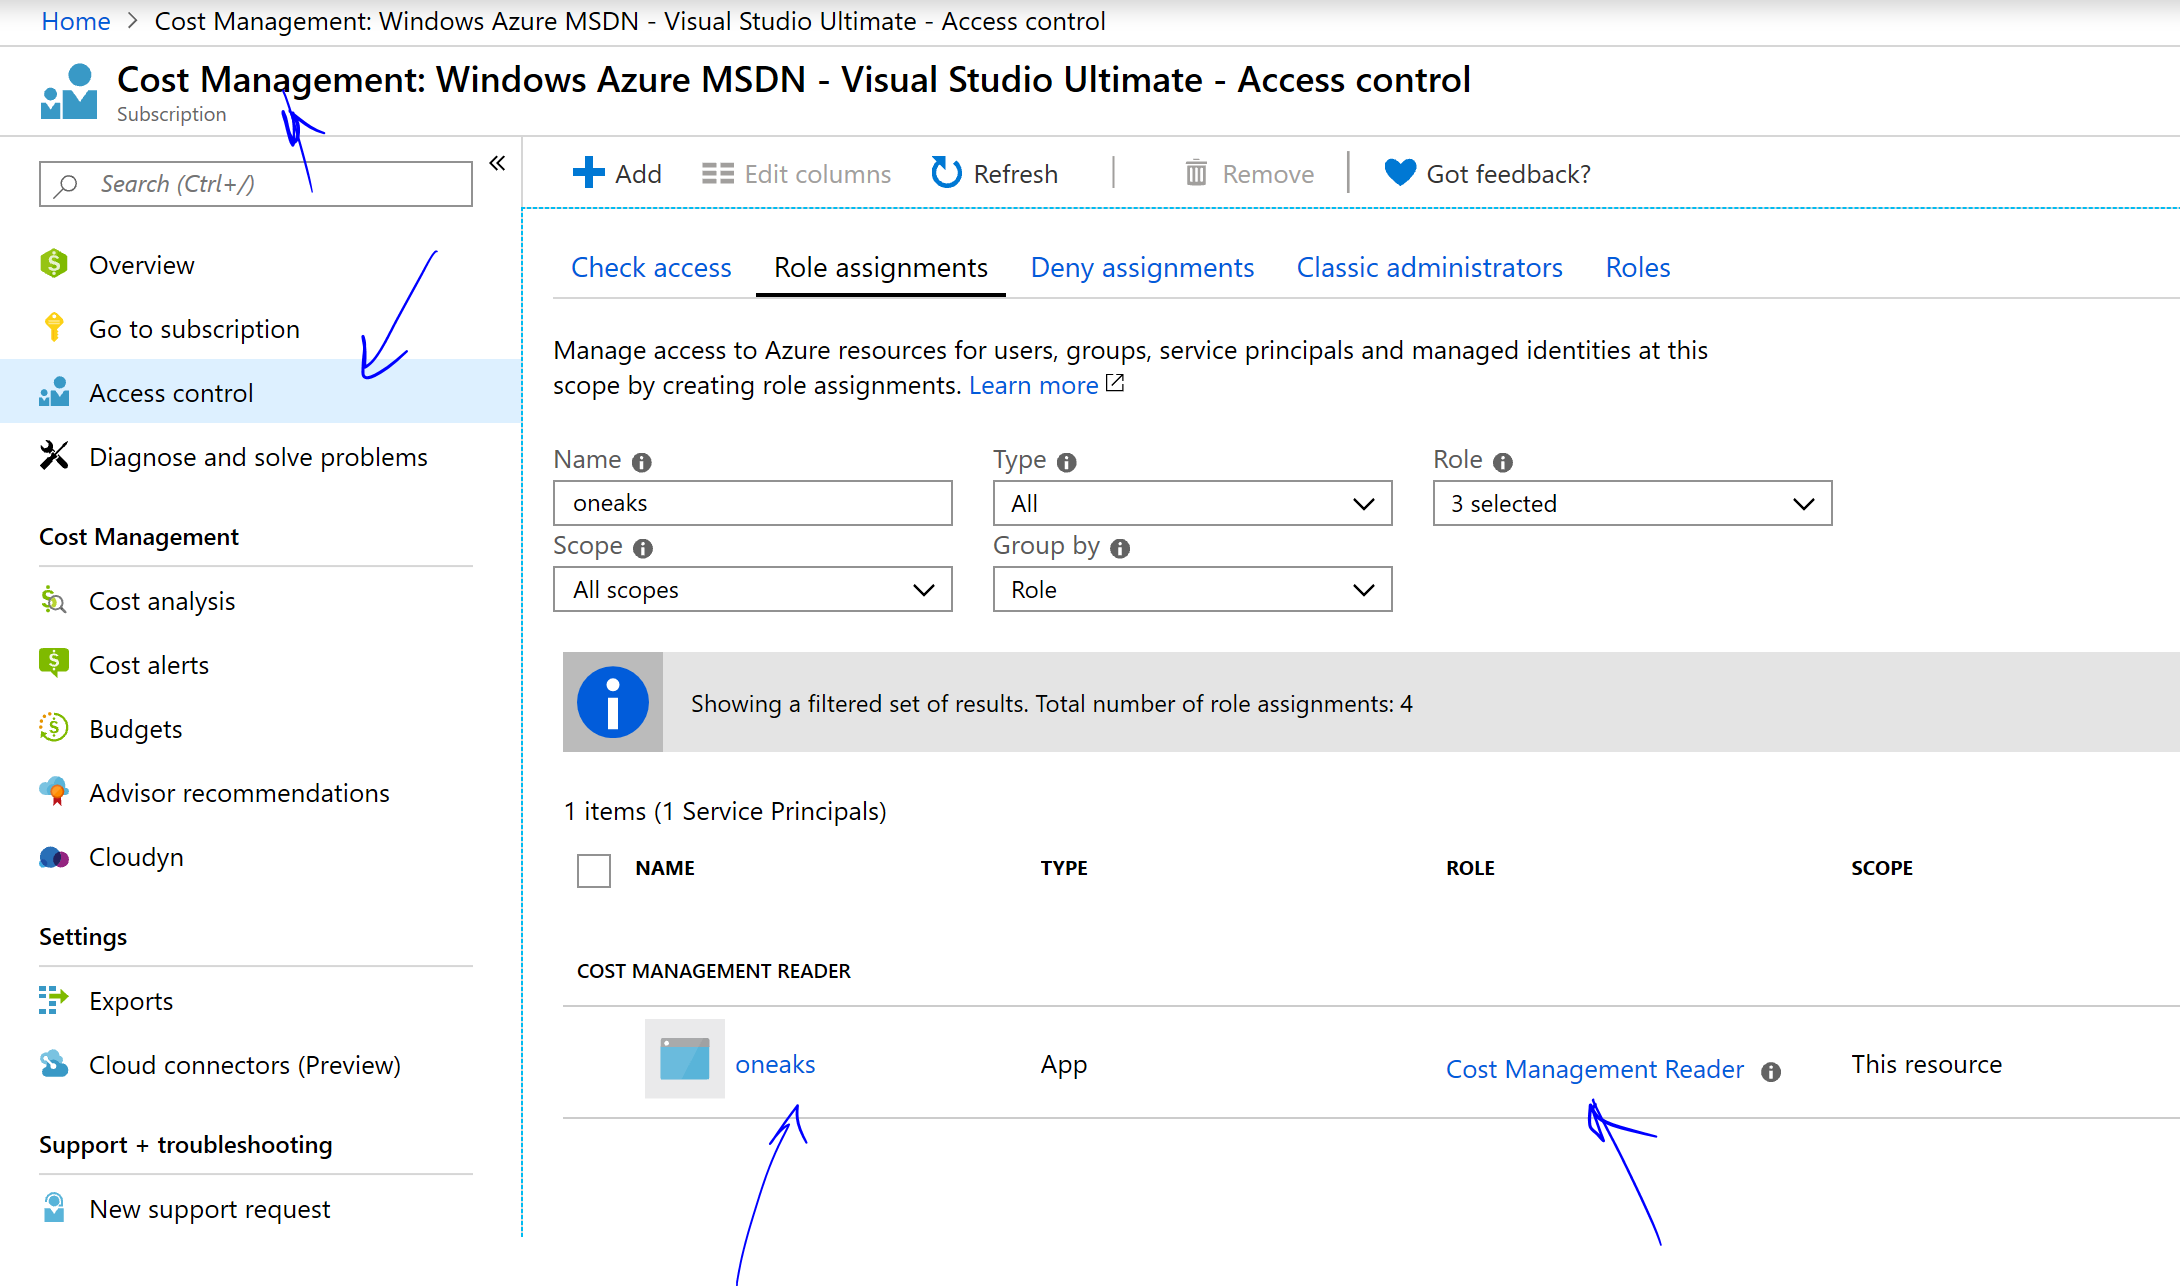
Provide the Postman Client access to Cost Management in Azure: Navigate to Cost Management in the Azure Portal, and in the IAM configuration, add a Role assignment ‘Cost Management Reader’ to the App registered in the previous steps. Once added, the configuration should appear as shown below:

CostMgmIAM

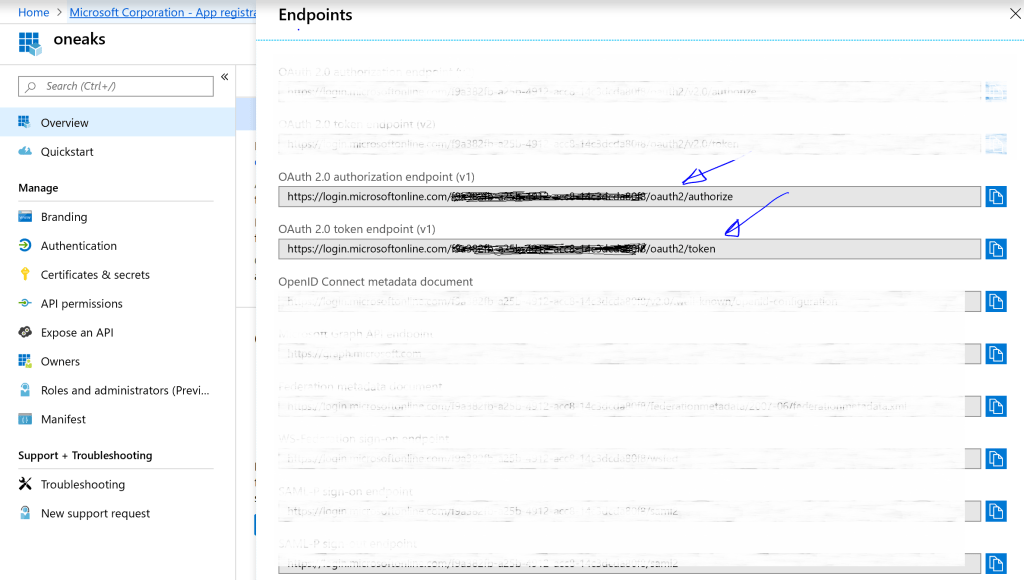
Call the REST API from Postman: Before you use Postman to make the API calls, get the a) Token endpoint URL & b) the Authorization Endpoint URL for the Azure AD Tenant where the App was registered in the steps earlier. See below:

From Postman, send a request to the Auth token endpoint URL, passing in the App ID (or Client Id), Secret, etc as shown below (Note: these need to be added in the Body of the Request as shown below). An Access token would be returned in the responseTokenIssuance

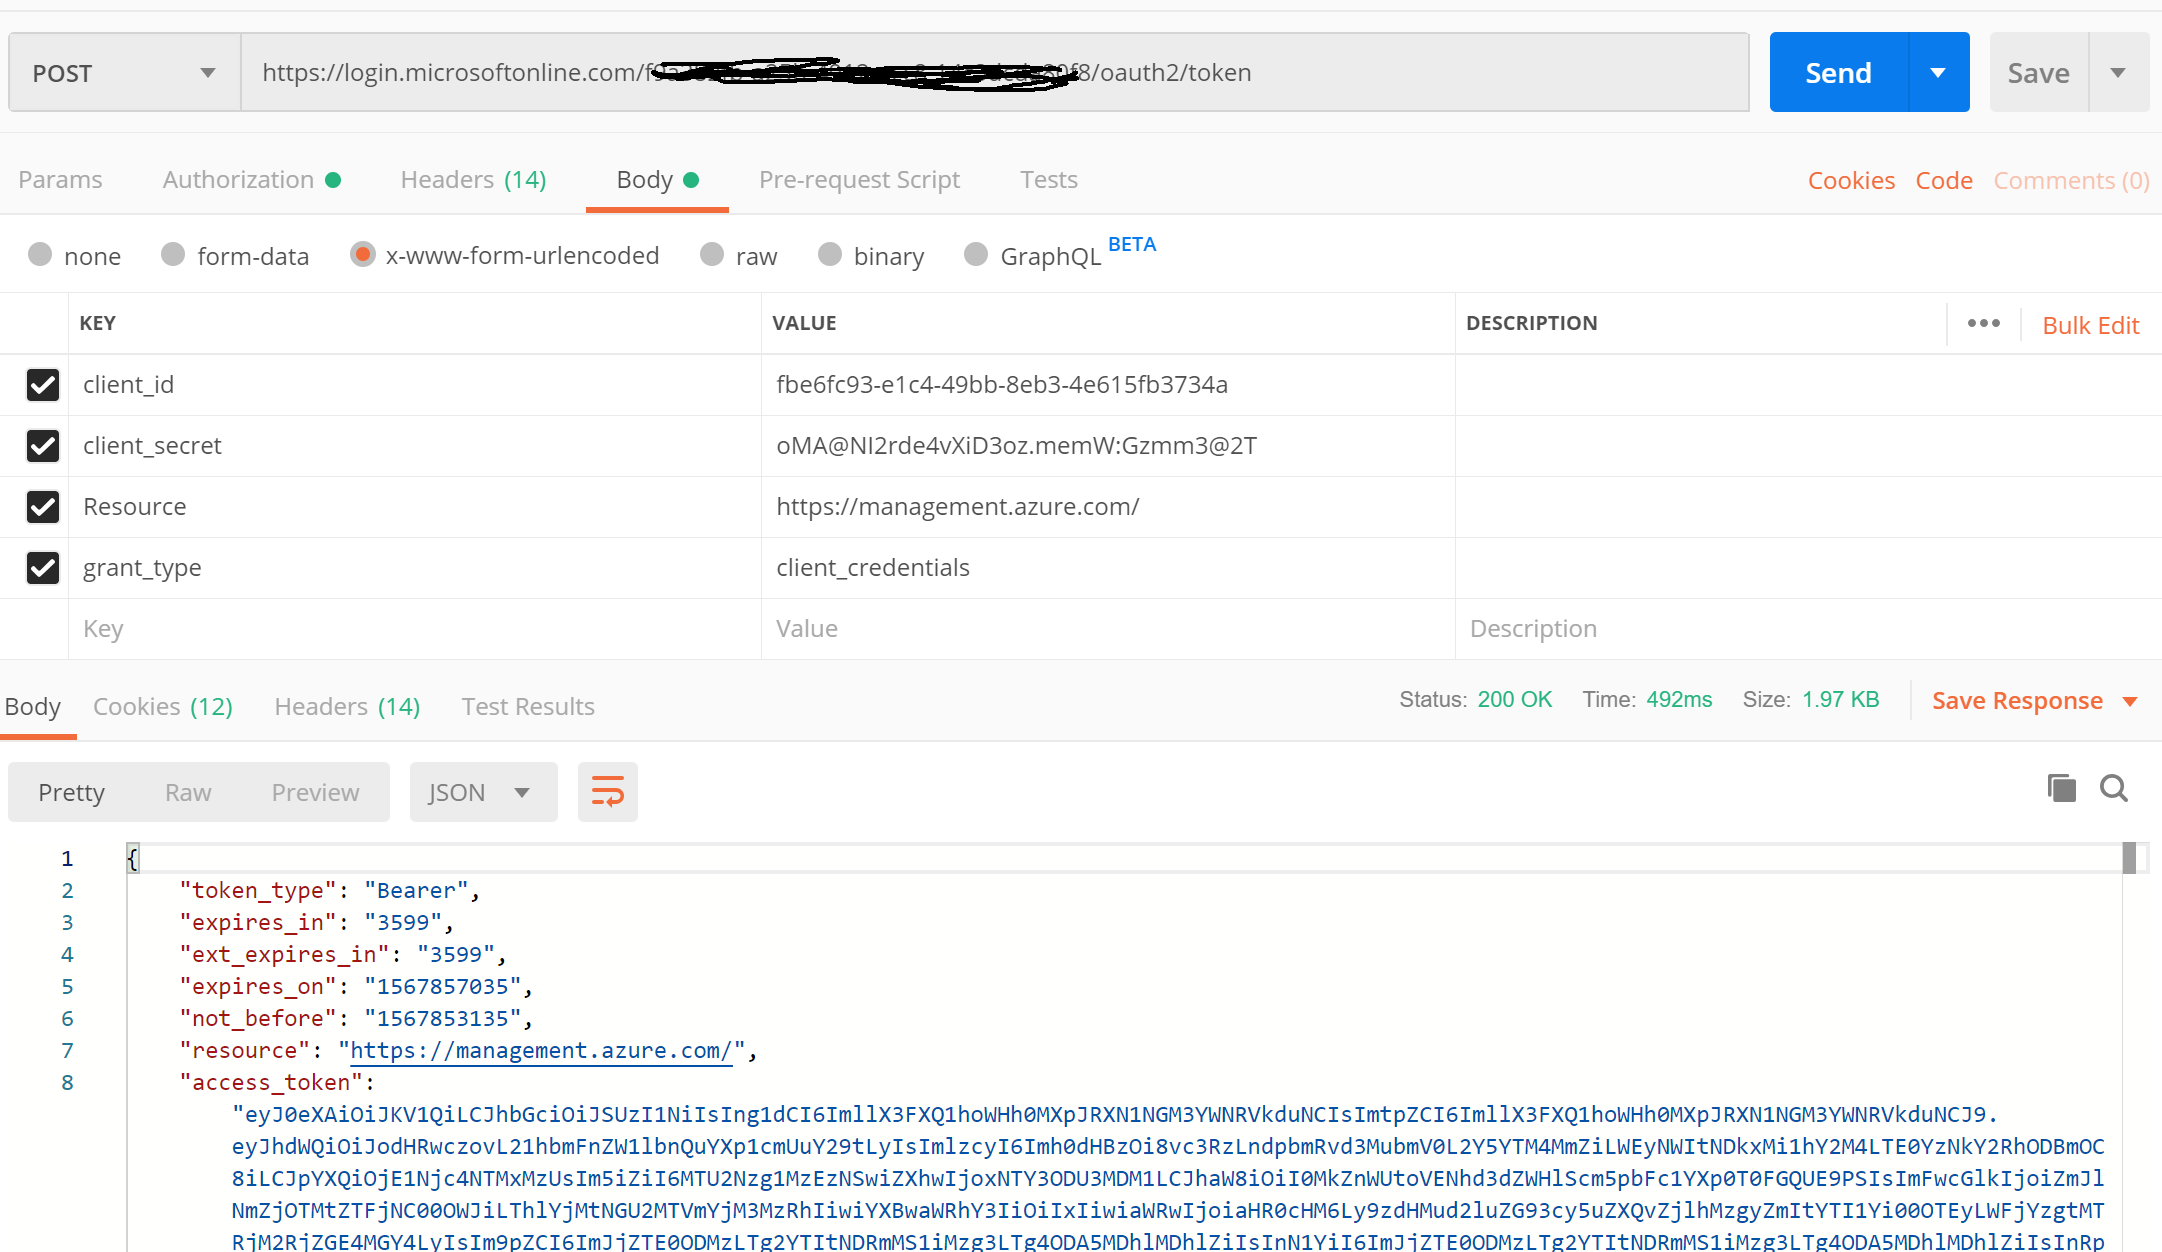
Call the Cost Management REST API and use the Auth Token obtained from the previous step. Choose the Authorization mode in Postman as ‘Bearer TokenInkedUseAccessToken_LI

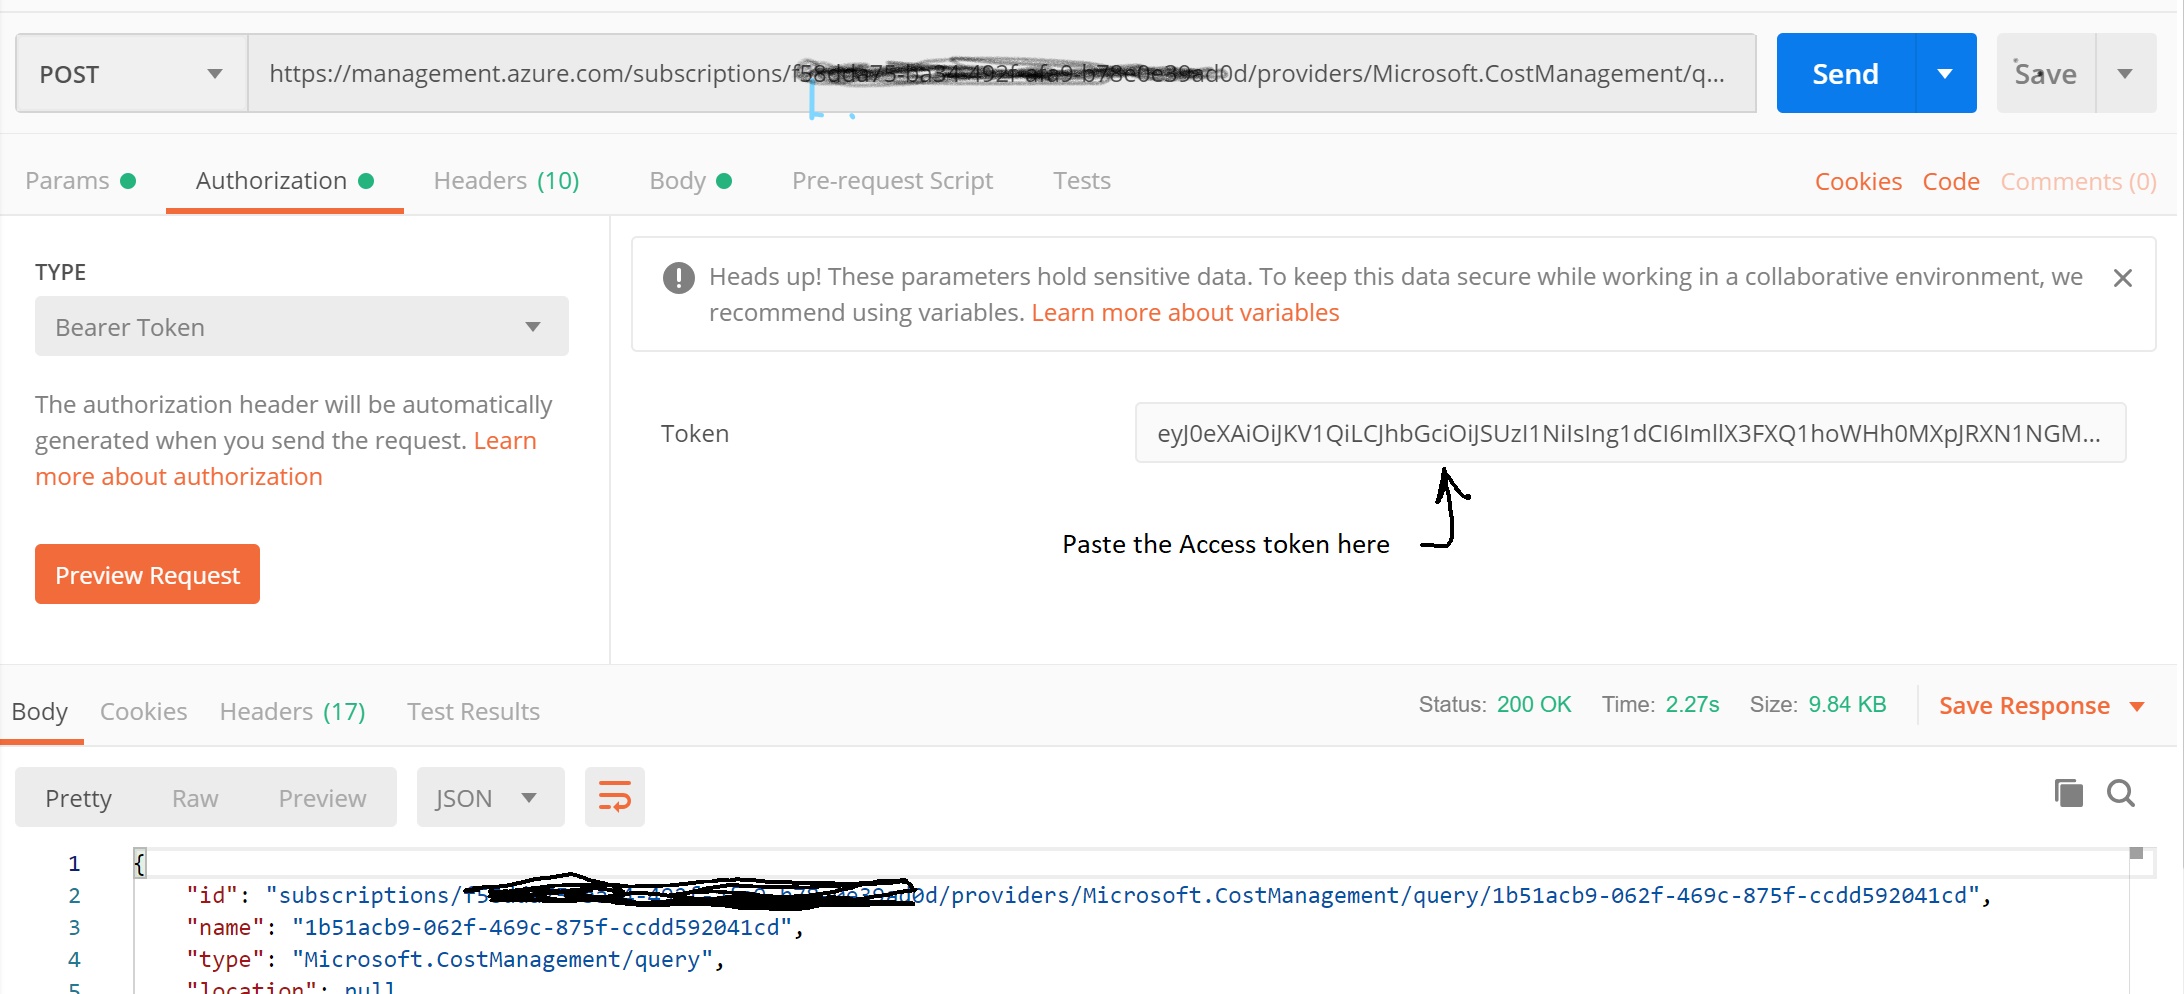
Paste the Request JSON as shown below into the Body of request

{
  "type": "Usage",
  "timeframe": "TheLastMonth",
  "dataset": {
    "granularity": "Monthly",
    "filter": {
      "dimensions": {
        "name": "ResourceType",
        "operator": "In",
        "values": [
          "microsoft.storage/storageaccounts"
        ]
      }
    },
    "aggregation": {
      "totalCost": {
        "name": "PreTaxCost",
        "function": "Sum"
      }
    },
    "grouping": [
      {
        "type": "Dimension",
        "name": "ResourceId"
      },
      {
        "type": "Dimension",
        "name": "Meter"
      }

    ],
    "sorting": [
      {
        "name": "Resource",
        "querySortingDirection": "Descending"
      }
    ]
  }
}

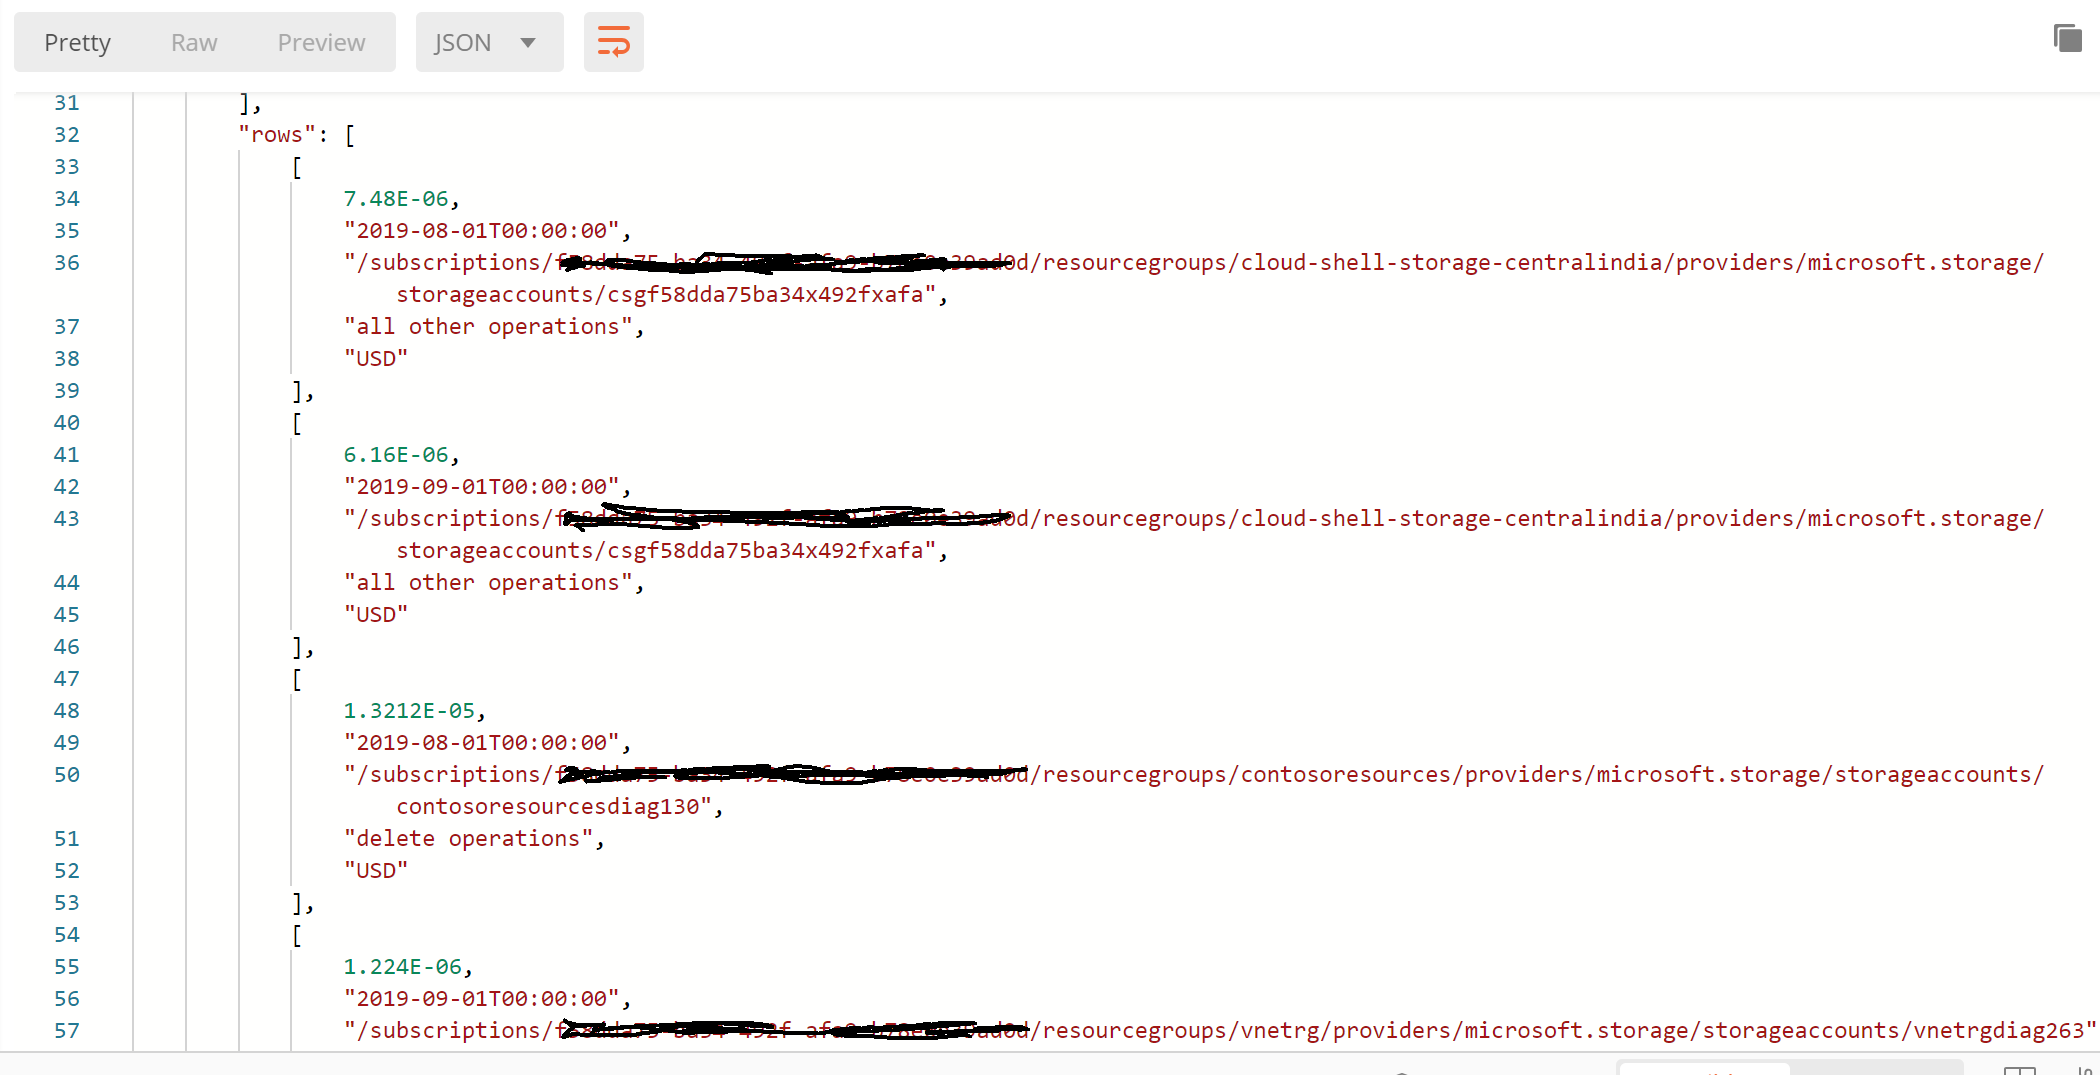
Post the request to the REST API endpoint as shown in the screenshot below. You should see the response with the Meter data broken down at each Resource Level.

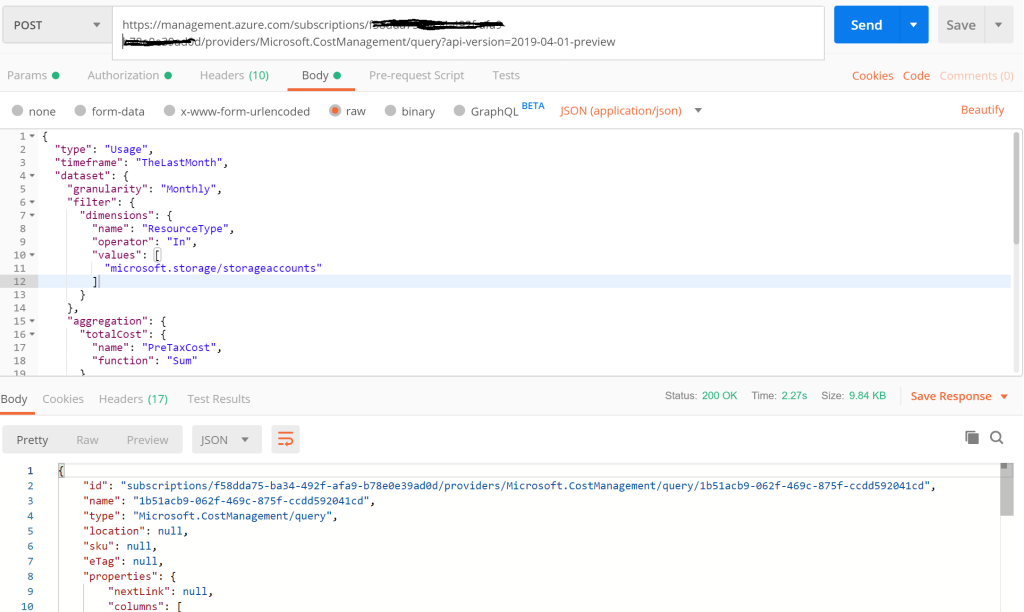
Notice that the Meter spend is broken down at the individual Storage Account Nameapiresponse

Secure access to Azure Blob Storage Account across Subscriptions and Azure AD Tenants

Azure VNet Service Endpoints configured on Services like Azure Blob Storage ensure that the Storage Account is protected from access over the Internet. Only Applications that are deployed inside the VNet-Subnet configured can access the Blob Storage Account, and the traffic travels through the Azure Backbone network.

What if the Applications are deployed to a VNet-Subnet in a different Azure Subscription, that has a separate Azure AD Tenant from the one where the Azure Storage Account resides? This scenario can be implemented using Azure CLI or PowerShell, which is described here.

Considered here are 2 different Azure Subscriptions, each with different Azure AD Tenants, and I will be configuring a VNet Service Endpoint from one Azure Subscription to a Storage Account in the other.

1) Subscription 1 with ID “fa895…” shown below uses my Work credentials. This is where the Storage Account is created, and the screenshot depicts the state before the VNet Service Endpoint was added.

Subscription 1 having Storage Account

2) The screenshot below is from Azure Subscription 2 with ID “f58dda….” It has a different AD Tenant, and I will use my outlook.com credentials here. A VNet & a Subnet are created here, and Service Endpoint policy is enabled on this VNet for Azure Storage Provider. See screenshot below

VNet in Subscription 2 having different Azure AD Tenant

3) I have launched Azure CLI and signed into Azure Subscription 1, where the Storage Account exists. I have used the Subnet ID (Resource ID from Subscription 2) in when running the CLI command below:

az storage account network-rule add –account-name crosstenantstr –resource-group crosstenantrg –subnet “/subscriptions/<Subscription 2 ID>/resourceGroups/vnetrg/providers/Microsoft.Network/virtualNetworks/vnetone/subnets/default”

4) When I check the Storage Account now in Subscription 1, notice that the Service Endpoint has been added to the Storage Account.

Service Endpoint added to Storage Account from another Subscription and AD Tenant

The warning seen above indicates that the logged in account in this Subscription cannot get the VNet Endpoint Status in the other Subscription, which has a separate AD Tenant.

5) I tried accessing the Storage Account using Storage Explorer from my laptop machine. As expected, it did not permit me since the Service Endpoint configured blocks access from the internet.

Client from Public IP cannot access the Storage Account

6) To check if it’s working, I have created a VM in Azure Subscription 2 inside the VNet and Subnet on which the Service Endpoint policy was set using CLI. Observe that I can access the Storage Account and the file within.

Application from within VNet-Subnet that has SE configured on Storage Account

Part 1 – Add life to your Line of Business Apps using Microsoft Bot Framework

Srikantan Sankaran 10/29/2016 6:57:03 AM


In this article, I have dealt with surfacing data from disparate Line of Business Applications like Dynamics CRM Online, Office 365 using Microsoft Flow, and consolidating them using Azure Search.

In the sequel to this article, a Bot Application would be used to access the information above, using the Lucence query syntax supported in Azure Search. LUIS (Language understanding Intelligence Service) would be used to interpret conversation style interactions from the Bot user.

Working with Azure Key Vault Certificates for secure exchange of data

Srikantan Sankaran 8/19/2017 4:12:11 PM


Abstract

Azure Key Vault (AKV) provides REST APIs that Applications could invoke to perform cryptographic operations like Encryption, Decryption signing and verifying signatures. For scenarios where integrated applications are deployed across Data Centers or geographies, it would be optimal to perform operations like encryption, locally, instead of making a REST API Call on Azure Key Vault. Covered here is a sample Application that uses a X509 Certificate on a local machine to encrypt the data, which is then decrypted using the AKV APIs.

The Certificates feature in AKV is used here. Creating a Certificate in AKV also creates a Private/public key pair in it. A Certificate Signing Request(CSR) is generated for this Certificate which is sent to a CA for signing. The resulting X509 Certificate issued by the CA can then be used in an Application to encrypt data locally. While this is the approach that could be used in Production scenarios, for simplicity here, a X509 Certificate is retrieved, using the AKV APIs instead. This contains the Public key information for the Certificate created in AKV earlier. This is saved to the local computer and then used in the Application to perform encryption locally.

The sample Visual Studio 2017 Solution file and the PowerShell scripts can be downloaded from the github repository here

To run the sample, the following steps need to be performed

1. Provision and configure Resources in Azure Key Vault

Run the GetAppConfigSettings.ps1 PowerShell script. It is located within the scripts subfolder in the Visual Studio Solution (AKVEncryptDecryptSample.Sln). Edit the variable names used in the script before execution. The following actions are performed by this script:

• Azure Key Vault created using the Premium Tier ( a pre-requisite if HSM enabled keys are a requirement)

• The sample application (the Visual Studio Solution in this article) gets registered with Azure AD and permissions provided to it to execute the Key Vault operations. A certificate is generated to authenticate the Application with Azure AD and is stored locally on the computer.

• Creation of a Certificate in AKV having its key in a HSM. Since this is for dev/testing, a self-signed certificate is created (-IssuerName Self). See the comments inline in the script below

[Note: In practice, a Certificate Signing Request(CSR) is generated for this Certificate from AKV, (steps documented here), which is signed by a trusted CA, and a X509 Certificate issued. This X509 Certificate, contains the Public key information for the Certificate created in AKV, and used in the Application to encrypt the payload with, locally. For simplicity here, instead, a Self-signed certificate generated in Key Vault is downloaded to the local machine using the AKV API. ]

Explained below are some of the snippets from the PowerShell script

#************************************************************************************************

# Create a Certificate in AKV, having a private key in HSM & non-exportable

#************************************************************************************************

$hsmcertificateName = “prohsmcert”

# Set the flag for Keytype as RSA-HSM; it should be non-exportable. Set the IssuerName as ‘Self’ since this would be

# used only for dev testing. (It would be set to ‘Unknown’ if it is to be sent to a CA for signing and issuance)

# set the Keyusage flags as shown. Data encipherment is not enabled by default, unless specified – it is required for decryption operation

$manualPolicy = New-AzureKeyVaultCertificatePolicy -SubjectName “CN=demohsm.corpmobile.in,

St=Karnataka, OU=IT, O=Demo Bank, STREET=Technology Links Park, L = Bangalore,

C=IN” -ValidityInMonths 24 -IssuerName Self -KeyType “RSA-HSM” -KeyNotExportable -KeyUsage keyEncipherment,digitalSignature,dataEncipherment

Add-AzureKeyVaultCertificate -VaultName $vaultName -Name $hsmcertificateName -CertificatePolicy $manualPolicy

# By default the key status is disabled. Need to enable it with this command

Set-AzureKeyVaultCertificateAttribute -VaultName $vaultName -Name $hsmcertificateName -Enable $true

$certificateOperation = Get-AzureKeyVaultCertificateOperation -VaultName $vaultName -Name $hsmcertificateName

$certificateOperation.Status

$certificate = Get-AzureKeyVaultCertificate -VaultName $vaultName -Name $hsmcertificateName

$certificate.KeyId

#KeyId contains the URI of the private Key generated for this Certificate

• Next, copy the xml settings with the resource names from the PowerShell script execution window (see below) and paste them into the app.config of the Visual Studio Solution – Name AKVEncryptDecryptSample.Sln.

# **********************************************************************************************

# Print the XML settings that should be copied into the app.config file

# **********************************************************************************************

Write-Host “Paste the following settings into the app.config file for the HelloKeyVault project:”

‘<add key=”VaultUrl” value=”‘ + $vault.VaultUri + ‘”/>’

‘<add key=”AuthClientId” value=”‘ + $servicePrincipal.ApplicationId + ‘”/>’

‘<add key=”AuthCertThumbprint” value=”‘ + $myCertThumbprint + ‘”/>’

‘<add key=”PrivateKeyUri” value=”‘ + $certificate.KeyId + ‘”/>’

‘<add key=”AKVCertificateName” value=”‘ + $hsmcertificateName + ‘”/>’

Write-Host

2. Running the Visual Studio Solution – AKVEncryptDecryptSample

a) Download the Public key content for the Certificate from Azure Key Vault Service and save to local Computer

In Program.cs, run only the DownloadCertificate() Method. This calls the GetCertificate API of AKV to get the CER content of the Certificate bundle. An X509 Certificate file gets saved to the bin\debug\Programcert.crt.

b) Install this Certificate into the Certificate Store of the Current user

c) In the Sender.cs file, change the search criteria for the Subject in the Certificate downloaded above.

if (c.Subject.Contains(“demohsm.corpmobile.in”))

d) In Program.cs, comment the DownloadCertificate() method and run the EncryptDecrypt() Method.

The Sender.cs program reads the text in the file in the Solution, encrypts it using the X509Certificate (Programcert.crt)from the local machine. The Receiver.cs program decrypts this content inside the HSM in AKV using the Private key in it.


The sample code referred in this article reuses most of what is available in the Azure Key Vault, Code Sample download Link  here, including the PowerShell scripts. Incremental changes have been made to implement the scenario covered here

Using Azure Key Vault to secure data exchange (Java)

Srikantan Sankaran 9/7/2017 6:21:40 AM


In this post, .NET Code was used to encrypt data using a X509 Certificate on the local Computer, and to invoke Azure Key Vault APIs to decrypt this data.

In the sample code available in the GitHub repository here, shown is how an equivalent could be implemented in Java, using the Azure SDK for Java. (The Source file from Eclipse and the pom.xml used are provided)

Some useful links:


Using Azure Functions, Cosmos DB and Powerapps to build, deploy and consume Serverless Apps

Srikantan Sankaran 7/22/2017 4:46:11 PM


Azure Functions can be used to quickly build Application as Micro Services, complete with turnkey integration with other Azure Services like Cosmos DB, Queues, Blobs, etc , through the use of Input and output Bindings. Inbuilt tools can be used to generate Swagger definitions for these Services, publish them and consume them in Client side Applications running across device platforms.

In this article , an Azure Function App comprising of 2 different Functions that perform CRUD operations on data residing in Azure Cosmos DB, will be created. The Function App would be exposed as a REST callable endpoint that would be consumed by a Microsoft Powerapps Application. This use case does not require an IDE for development. It can be built entirely from the Azure Portal and the browser.

[The Powerapps App file, C# Script files, Yaml file for the Open API Specs created for this article can be downloaded from this Gtihub location here]

  1. Creation of a DocumentDB database in Azure Cosmos DB

Use the Azure portal to create a DocumentDB database. For the use case described in this article, created is a Collection (expensescol) that stores Project Expense details, comprising the attributes shown below.


2. Creation of a Function App that implements the Business Logic in Service

Two Functions are created in this Function App using C# Scripts.

  • GetAllProjectExpenses that returns all the Project Expenses Data from the collection in Cosmos DB
  • CreateProjectExpense that creates a Project Expense Record in Cosmos DB

a) Function GetAllProjectExpenses ->

The Input and output Binding configured for this Function:


Apart from the HTTPTrigger input binding for the incoming request, an additional input binding for Cosmos DB  is configured that retrieves all the Expense records from the database. Due to this binding, all the Expense records are available to the Run Method through the ‘documents‘ input parameter – see screenshot of the C# Script used in this Function, below.


[Note: The scripts provided here are only meant to illustrate the point, and do not handle best practices, Exceptions, etc]

Refer to the Azure Documentation for detailed guidance on configuring Bindings in Azure Functions, for HTTPTriggers and Azure CosmosDB

b) Function CreateProjectExpense ->

The binding configuration used for this Function is:


Notice that there are 2 output bindings here, one for the HttpResponse and the other is the binding to Cosmos DB to insert the expense record into it.

[Note:
When the Run method in  a Function is invoked asynchronously, we cannot use an ‘out’ parameter to the Cosmos DB Binding and an
‘out’ for the HttpResponse in it. In such cases, we need to add the document meant for insertion into an IAsyncCollector Object reference, ‘collector’ in this case. Note that the  parameter ‘collector’ is used in the output binding to Cosmos DB, shown above .
Refer to the documentation here for more info pertaining to scenarios with multiple output parameters]


3. Test the Functions created 

Use Postman to ensure both the Functions work without errors. The HttpTrigger Url can be obtained from the C# Script Editor View of the Function


4. Generating an OpenAPI (Swagger) Definition for the Function App

A Function App could contain different Functions, each of which could potentially be written in different programming languages. All of these Functions or individual ‘Micro Services’ could be exposed through a single base end point that represents the Function App. From the Application Settings, navigate to the ‘API Endpoint’ Tab.

Click on the button ‘Generate API definition template’ to generate a base definition of the Swagger. But it lacks all the elements required to fully describe the Functions. The definition, described in Yaml format, has to be manually edited in the editor pane. The Yaml file created for this Function is available along with the other artefacts in this blog Post.


Refer to this , this  and this links that provides guidance on working with Yaml to create the Swagger definitions, or using other options to create it.

[Note: The samples considered in the links above use simple primitive types as parameters in the Method calls. The scenario in this article however deals with Collections, and needs more work to get the Yaml right. Refer to the artefacts download link in this article to view the Yaml that was created for the scenario in this blog post]

[Note: For simplicity in this article, I have considered the option provided by Functions to add the API key in the Request URL, under the key ‘code’.  For more secure ways to deal with it, use Azure AD integration or other options]

After the Yaml is created and the definition is complete, test the requests from the Test console on the Web Page, and ensure that the Functions work without errors. Once tested, click on the button ‘Export to Power Apps and Flow’ to export the Swagger definition and create a Custom connector in the latter.

5. Create a new custom Connection in powerapps.microsoft.com from the connector registered in the previous step. Embed the Security code for the Function App. This gets stored with the connection and automatically included in the request by Powerapps to the REST Services deployed on Azure Functions.


6. Create a new Powerapps App that would consume the REST Services exposed by Azure Functions in the earlier steps

While you could start with a blank Template, it involves some work to create the different Forms required in the App for ‘Display All’, ‘Edit’ and ‘Browse All’ use cases. Powerapps supports the ability to automatically generate all these Forms and provide a complete App, when selecting a Data Source like OneDrive, SharePoint Office 365 Lists, and many others. Since the ‘ProjExpensesAPI’ Connector we have created is a custom one, this Wizard is not available to create the App automatically.

To work around this, I have created a Custom List in Office 365, that has the same fields as in the Expense data returned by the Function App. I used the wizard to generate a complete App based on the Custom List in Office 365, and then changed all the Data Source references from it to the ‘ProjExpensesAPI’ Connection.


Note in the screenshot above, how the Logged in User context can be passed through ‘Excel like’ functions to the Search Box. The data is filtered after it is received from the REST APIs. Notice how our custom API is invoked below, and the data returned is filtered using the expression shown


The screen shots of the App with each of the Forms is shown below. This App can be run on any of Windows, Android or iOS Mobile Devices.


Test the App to ensure that all the REST API operations like GetAllExpenses and CreateProjectExpense requests work from the App. It can then be published by the user and shared with others in the Organization.

The powerapps App file is also provided along with the other artefacts in this article.


Use Azure policy Service to manage Azure Resources and stay compliant with corporate standards

Srikantan Sankaran 6/6/2018 4:50:17 PM


Azure policy Service can be used to implement rules that helps organizations stay compliant when deploying and configuring resources in Azure. This sample implements a rule that ensures that no Compute resources in Azure, like Virtual Machines are deployed without having mandatory tags included in the Provisioning request. The tag names used are ‘Cost Center Name’ to be able to attribute the charge to, and the ‘Service Name’ of the Application that would be hosted in the Virtual Machine.

Using an Azure Policy Service Policy ensures that these rules are honored irrespective of how the resource is provisioned, be it using ARM Template, Azure Portal, CLI, or using the REST API.

Policy Definition

The Json document (VMTagsPolicy.json) representing the Policy definition is available in the GitHub repository accompanying this post. The screen shot below shows the Policy definition.


Refer to the Azure documentation for the steps to define a Policy and assign it – here  and here .

In the Policy rule defined above, if either of the Tags are not specified in the request, the Provisioning request gets denied. The tag values are also validated to ensure that they are in the list of allowed Cost Center and Service Name values that were specified in the Policy assignment.


The tag values are parameterized, and allowed values for Cost Center and Service Names bound to a predetermined set of values in the JSON definition.

Policy Assignment

In this example, the Policy is assigned to a specific Resource group in the current Azure Subscription, so that the Policy gets applied only to this scope. The allowed values for the Cost Center codes in this assignment are  “Cost Center 1” and “Cost Center 2”. (See screenshot below)


Validating this Policy by provisioning a VM using different options

1) Using CLI

az vm create –resource-group azpolicyrg –name azpolicyvm1 –image UbuntuLTS –admin-username onevmadmin –admin-password Pass@word123 –debug


The request above fails since the tags were missing in the request.

The next request below fails since the values set for the tags did not conform to the allowed values specified in the Policy assignment defined in the previous steps.

az vm create –resource-group azpolicyrg –name azpolicyvm1 –image UbuntuLTS –admin-username onevmadmin –admin-password Pass@word123 –tags CostCenter=”Cost Center 4″ ServiceName=”Service 1″ –debug

The request below includes all the mandatory tags and the allowed values as set in the Policy definition, hence it succeeds and the VM gets provisioned.

az vm create –resource-group azpolicyrg –name azpolicyvm1 –image UbuntuLTS –admin-username onevmadmin –admin-password Pass@word123 –tags CostCenter=”Cost Center 2″ ServiceName=”Service 1″ –debug

2) Using an ARM Template

The ARM template (SimpleVmJson.json) used here is uploaded to the GitHub Repository referred to in this article

Selecting a wrong value for the Cost Center Code (‘Cost Center 3’ selected in the ARM Template is not from among the list of allowed values in the Policy Assignment created in the previous steps), fails the resource provisioning request. See screenshot below


3) Using the Azure portal to create a VM will not succeed, since the wizard does not provide an option to specify tags. However, when a user edits the tags in a VM that already exists, the Policy validation kicks in and ensures that any changes that violate the policy are disallowed.

In the screen shot below, setting a value different from that in the policy definition or deleting the ‘Cost’ Center’ tag, and selecting ‘save’ errors out citing the Policy violation.


While in the Policy definition the rule action is set to ‘Deny’ when the validation fails, and the VM provisioning fails, setting the rule action to ‘audit’ could be used instead to ensure that the provisioning requests succeeds, but the violations are written to audit and surfaces in the compliance dashboard. An organization could take corrective action manually, and at their convenience.

Scenario 2:

Azure Storage now provides the option to associate a Vnet Service endpoint to it, that ensures that only services deployed in the Subnet would have access to the Storage account.

The Policy definition below implements this rule, whereby only requests to provision a Storage account that have a VNET Service endpoint configured would be permitted, else the action is set to ‘deny’ the request. See screenshot below for the Policy Definition. The Policy definition file, StorageSecurityCompliance.json is available in the GitHub Location accompanying this article


Secure Your Sensitive Business Information with Azure Key Vault


Srikantan Sankaran 3/2/2018 1:48:47 AM


Azure Key Vault is a cloud-based service that lets organizations securely store sensitive business information. It lets you perform cryptographic operations on the data, and provides a framework for implementing policies to regulate access to applications, as well as an API model for applications to work with the keys, secrets and certificates stored in it. The SDKs that Azure Key Vault provides support a variety of device platforms and programming languages, allowing you to choose your preferred language and to deploy these applications to Azure App Service as managed Web applications. To expose these business applications securely to users both within an organization and outside, Azure Active Directory (Azure AD) and Azure Active Directory B2C (Azure AD B2C) provide turnkey implementations to enable authentication and authorization to the applications with minimal or no custom code.

In this article in the MSDN Magazine, presented is a solution that demonstrates how Azure Key Vault can bring enhanced security to your organization. The Source code accompanying the article can be accessed here